Using Emacs as a C++ IDE
By on July 17, 2016
An updated version of this post is available
here.
Last year I wrote a post
about using Flymake with Emacs to get on-the-fly
syntax checking. Recently I watched a cppcon lightning talk by
Atila Neves on his setup for using Emacs as a C++ IDE and was inspired
to adapt this to my own needs. In this post I will guide you through
the setup process, which will carry over to Aquamacs for the most part
too. I’ll try to note any differences as they come up. This guide will
also use Homebrew for installing some additional software,
but on Ubuntu you should be able to get it from apt. Please note that
I take no credit for this setup at all. It is all thanks to the many
developers and blog authors whose content I was able to use and
piece together. I will do my best to cite any resources as I go. I
apologize in advance for anything I missed.
Additional Software Installation
First we will install the necessary backends using brew and then
move on to the actual Emacs setup. All of the packages listed here should
be installed by running brew install package. I recommend that at this
stage you run brew update to make sure you are getting the latest version
of all the packages. Let us first install the package Bear (Build
EAR) for recording how your project is
compiled. It won’t be necessary for all projects, but definitely for some.
To install it, run brew install bear. If you use LaTeX I recommend you
install the package chktex using brew as well.
In order to be able to use RTags to navigate your project
you should install LLVM using
brew install llvm --with-libcxx --with-clang --without-assertions --with-rtti.
I suggest you follow the RTags website for the most up-to-date
installation instructions. It may look long, but it is rather straight forward
to do. You can actually install RTags from brew by running brew install rtags,
but note that you still need LLVM. Note that we will be changing the
way we launch rdm later (if you don’t know what rdm is, see here).
One really cool thing about RTags is that it is not specific to Emacs.
You can use it with vim, sublime, Atom, and possibly other editors too.
The last package I suggest you install is clang-format, which allows you to
format parts or the entirety of your code to a a certain style. This is
extremely useful for ensuring uniform style across a project and for
maintaining readability. ClangFormat also is not tied to Emacs and can be used
stand alone or in other editors.
As a side note, if you want to try the clang-complete part of the IDE (I use
Flycheck’s clang-mode), you will probably have to install the
emacs-clang-complete-async package from brew or from the project’s
GitHub page.
Emacs Configuration
Below I’ll go over my Emacs init file (~/.emacs) in a sort of section by section
approach.
General Settings
What often annoys me in Emacs is that I have to type “yes” or “no”. I’d much prefer
to just type “y” and “n”. This can be done (thanks to the post here)
by adding the following to your init (~/.emacs) file:
;; We don't want to type yes and no all the time so, do y and n
(defalias 'yes-or-no-p 'y-or-n-p)
I also find the #...# auto-save files annoying, so let’s disable that by adding
(setq auto-save-default nil)On OSX you will have to set additional paths in Emacs so that it can find the packages you install from brew. Add the following to the start of your init file:
;; Add these to the PATH so that proper executables are found
(setenv "PATH" (concat (getenv "PATH") ":/usr/texbin"))
(setenv "PATH" (concat (getenv "PATH") ":/usr/bin"))
(setenv "PATH" (concat (getenv "PATH") ":/usr/local/bin"))
(setq exec-path (append exec-path '("/usr/texbin")))
(setq exec-path (append exec-path '("/usr/bin")))
(setq exec-path (append exec-path '("/usr/local/bin")))
Now, the easiest way to install all the packages we will use is to add the following to your init file:
(require 'package) ;; You might already have this line
(add-to-list 'package-archives
             '("melpa" . "https://melpa.org/packages/"))
(when (< emacs-major-version 24)
  ;; For important compatibility libraries like cl-lib
  (add-to-list 'package-archives '("gnu" . "http://elpa.gnu.org/packages/")))
;; You might already have this line
(package-initialize)
;; list the packages you want
(defvar package-list)
(setq package-list '(async auctex auto-complete autopair clang-format cmake-ide
                           cmake-mode company company-irony
                           company-irony-c-headers dash epl flycheck
                           flycheck-irony flycheck-pyflakes
                           google-c-style helm helm-core helm-ctest
                           helm-flycheck helm-flyspell helm-ls-git helm-ls-hg
                           hungry-delete irony
                           let-alist levenshtein magit markdown-mode pkg-info
                           popup rtags seq solarized-theme vlf web-mode
                           window-numbering writegood-mode yasnippet))
;; fetch the list of packages available
(unless package-archive-contents
  (package-refresh-contents))
;; install the missing packages
(dolist (package package-list)
  (unless (package-installed-p package)
    (package-install package)))
This will automatically install any packages listed in the
package-list variable if it is not already installed.
If you are using a recent version of Emacs (24.3 or newer)
then everything should install without any issues.
If you are using Aquamacs on OSX then you may need to comment
out the lines below ;; install the missing packages and install
the packages yourself manually.
On The Fly Syntax Checking: Flycheck
Compiling code or running through an interpreter takes time. Time is probably
our most valuable personal resource. I’ve recently made the change from
Flymake to Flycheck. One of the reasons is that
it can be integrated with
a compile_commands.json file that is generated by Bear. I also
have to write some python code on occasion, and there too I don’t want to
spend time running the code to check for errors. Flycheck offers an extension,
flycheck-pyflakes that does python syntax checking really well. Combining
these, I get a short section for my init file, but you will want to
use cmake-ide to get the most out of it. Here is the relevant code:
;; Require flycheck to be present
(require 'flycheck)
;; Force flycheck to always use c++11 support. We use
;; the clang language backend so this is set to clang
(add-hook 'c++-mode-hook
          (lambda () (setq flycheck-clang-language-standard "c++11")))
;; Turn flycheck on everywhere
(global-flycheck-mode)

;; Use flycheck-pyflakes for python. Seems to work a little better.
(require 'flycheck-pyflakes)
Now there are sometimes some annoying things with Flycheck. While working on a large (and quickly growing) project I found that I sometimes got bizarre errors such as not being able to find a certain type, specifically a class we wrote, or even that there were errors in one of the included STL headers. This seemed really strange to me, especially because RTags syntax checking did not find these errors (I use RTags and Flycheck for syntax checking of larger projects). To make things even stranger, the code compiles fine. So after much stumbling around I think I finally understand what the issue is. Flycheck seems to parse the code local to the buffer, and so if that code does not compile stand-alone then you get strange errors. This could be seen as a good thing since it will force developers to explicitly include headers they use rather than using functions or classes because they are included in a header file that’s being included. So the lesson here is that if you get strange errors, don’t look at the first error, look at all of them and see if it could be related to missing headers preventing Flycheck from analyzing the code locally.
cmake-ide and RTags
Flycheck integrates nicely with the cmake-ide package. The nice thing
about cmake-ide is that it also sets up RTags for your project. To enable
RTags and cmake-ide, add the following to your init file:
;; Load rtags and start the cmake-ide-setup process
(require 'rtags)

;;;;;;;;;;;;;;;;;;;;;;;;;;;;;;;;;;;;;;;;;;;;;;;;;;;;;;;;;;;;;;;;;;;;;;
;; Setup cmake-ide
;;;;;;;;;;;;;;;;;;;;;;;;;;;;;;;;;;;;;;;;;;;;;;;;;;;;;;;;;;;;;;;;;;;;;;
(require 'cmake-ide)
(cmake-ide-setup)
;; Set cmake-ide-flags-c++ to use C++11
(setq cmake-ide-flags-c++ (append '("-std=c++11")))
;; We want to be able to compile with a keyboard shortcut
(global-set-key (kbd "C-c m") 'cmake-ide-compile)

;; Set rtags to enable completions and use the standard keybindings.
;; A list of the keybindings can be found at:
;; http://syamajala.github.io/c-ide.html
(setq rtags-autostart-diagnostics t)
(rtags-diagnostics)
(setq rtags-completions-enabled t)
(rtags-enable-standard-keybindings)
You might notice that I set a keyboard shortcut, C-c m, for compiling
with cmake-ide.
Now let me discuss RTags and what I had to do to get cmake-ide to behave the
way I wanted it to. I’ll start with RTags. RTags needs the r-daemon (rdm) to
be running to handle generating and finding the tags. This is reasonable and
you can customize the behavior of the daemon a lot. Just look at the manual
entry and you’ll see that it really allows for a lot of customization. One
thing that troubled me was that by default when it re-indexes a project it
runs the process rp on 8 threads and with a nice of -1. Now my notebook only
has 4 physical cores, so with hyperthreading that means it’s running at full
capacity for a thread that really should be a background thing I hardly notice.
The reason this is annoying is because if you are working on a file that is
a dependency of a large portion of your project RTags re-indexes a large portion
of the project, or at least does a lot of work. Since cmake-ide starts the rdm
on its own, I had to change the way it behaves. The other problems I encountered
were that cmake-ide does not use multiple threads for building and also doesn’t
seem to have an option for Build EAR. Because my changes to cmake-ide are
currently hard-coded I have not contributed them back to the project, but let
me tell you the way you can recompile cmake-ide to behave better.
The first thing I changed was to have cmake-ide call make using Build EAR and
to build using 8 threads so that I don’t have to wait very long for the build
to finish. To do this you must find the cmake-ide.el file. It could be
located in ~/.emacs.d/elpa/cmake-ide... or if you’re using Aquamacs it will be
in ~/Library/Preferences/Aquamacs Emacs/Packages.
I changed the line in the function
cmake-ide--get-compile-command that says
((file-exists-p (expand-file-name "Makefile" dir)) (concat ... to say
((file-exists-p (expand-file-name "Makefile" dir)) (concat "bear --append make -j8 -C " dir))
You can specify however many threads you want to build with and if you don’t
want to build with Bear then simply remove bear --append . Next, to get
rdm to run on only 2 cores and have a larger nice value I changed the function
cmake-ide-maybe-start-rdm by adding "-j 2" "-i 40" "-a 10" after
cmake-ide-rdm-executable in the start-process call. Here the -a specifies
the niceness and -i the number of translation units to cache. Now you have
recompile cmake-ide by doing M-x and then running byte-force-recompile and
selecting the directory that cmake-ide.el is in. Do not specify the file
itself, just the directory.
The last piece of advice for using RTags is that you shouldn’t save very often. Every time you save a file it gets re-indexed so if you change something small and start thinking about the next line don’t immediately save, unless you want RTags to be re-indexing continually and using up your computing resources.
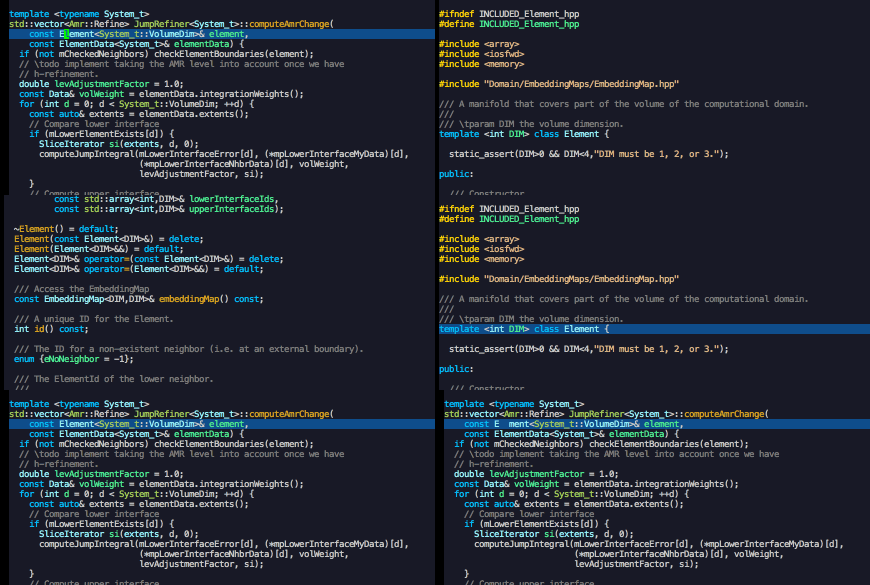
RTags allows you to quickly navigate around your code. Here is an example
of jumping straight to the header file where the class is declared that
is actually intentionally performed a bit slower than you can do in practice:
Since I consider legible code part of having correct code I’ll mention
ClangFormat here. ClangFormat automatically formats your code
to conform to a specific style. There are several built-in presets but you
can also add your own. ClangFormat will search up directories until it reaches
a .clang-format file and then uses that. This means you can specify
formatting for each project individually by placing a .clang-format file
in the root directory of your project. Since it’s a text file you can even
track it with git. One nice things is that we can actually call ClangFormat
to format the selected line or region. For this to work add the following
to your init file:
;; clang-format can be triggered using C-M-tab
(require 'clang-format)
(global-set-key [C-M-tab] 'clang-format-region)
;; Create clang-format file using google style
;; clang-format -style=google -dump-config > .clang-format
I use the keyboard shortcut C-M-tab but you may change this if you wish.
Helm
Helm is a framework for incremental completions that allows fuzzy matching and a variety of other powerful features. For example, integrating helm with git allows you to search your project for files no matter which directory you are currently in. Helm’s search is also case-insensitive meaning you don’t have to deal with pesky CamelCase spelling of filenames. Helm also offers similar features for the command-prefix (Meta-x), the buffer list, mini buffer list, finding files, ctest (which you are using, right?) and many others that I have not yet explored. You can also integrate it with Flycheck and Flyspell to get nicer windowing and navigation with them. I’ll discuss Flyspell in more detail below, but for now, here is my helm configuration:
;;;;;;;;;;;;;;;;;;;;;;;;;;;;;;;;;;;;;;;;;;;;;;;;;;;;;;;;;;;;;;;;;;;;;;
;; Set up helm
;;;;;;;;;;;;;;;;;;;;;;;;;;;;;;;;;;;;;;;;;;;;;;;;;;;;;;;;;;;;;;;;;;;;;;
;; Load helm and set M-x to helm, buffer to helm, and find files to herm
(require 'helm-config)
(require 'helm)
(require 'helm-ls-git)
(require 'helm-ctest)
;; Use C-c h for helm instead of C-x c
(global-set-key (kbd "C-c h") 'helm-command-prefix)
(global-unset-key (kbd "C-x c"))
(global-set-key (kbd "M-x") 'helm-M-x)
(global-set-key (kbd "C-x b") 'helm-mini)
(global-set-key (kbd "C-x C-b") 'helm-buffers-list)
(global-set-key (kbd "C-x C-f") 'helm-find-files)
(global-set-key (kbd "C-c t") 'helm-ctest)
(setq
 helm-split-window-in-side-p           t
   ; open helm buffer inside current window,
   ; not occupy whole other window
 helm-move-to-line-cycle-in-source     t
   ; move to end or beginning of source when
   ; reaching top or bottom of source.
 helm-ff-search-library-in-sexp        t
   ; search for library in `require' and `declare-function' sexp.
 helm-scroll-amount                    8
   ; scroll 8 lines other window using M-<next>/M-<prior>
 helm-ff-file-name-history-use-recentf t
 ;; Allow fuzzy matches in helm semantic
 helm-semantic-fuzzy-match t
 helm-imenu-fuzzy-match    t)
;; Have helm automaticaly resize the window
(helm-autoresize-mode 1)
(setq rtags-use-helm t)
(require 'helm-flycheck) ;; Not necessary if using ELPA package
(eval-after-load 'flycheck
  '(define-key flycheck-mode-map (kbd "C-c ! h") 'helm-flycheck))
To activate helm-flycheck use the keyboard shortcut C-c ! h and
to use helm-ctest C-c t. When in helm-ctest you can type the name
or partial name of a test to limit the tests disabled. To run a test
press enter (I use C-m) and to select several tests to run use
press C-space on each test you want to execute, then press enter.
The tests will run and you will get immediate feedback on whether
or not they passed.
Code Completion: Company, Irony and Semantic
Note: This part of the post is still somewhat in progress. I’m happy with the current behavior but may find bugs and improvements as time goes on. If there are any, I’ll post updates here.
First thing, company stands for “Complete Anything” and so you can
probably guess we will leverage it as our backend for code completion.
It is also useful for all around completion. The other nice thing is
we can use company to get STL and C library header completion,
query RTags for completions, ask clang to give completions for the
entire STL, and still use Yasnippet for custom completions to save
us typing out mundane things like for loops.
Let’s start with getting Yasnippet set up. Yasnippet comes with several useful snippets for code completion, but to really get the most out of it you will want to use the snippets from here
;;;;;;;;;;;;;;;;;;;;;;;;;;;;;;;;;;;;;;;;;;;;;;;;;;;;;;;;;;;;;;;;;;;;;;
;; Package: yasnippet
;;;;;;;;;;;;;;;;;;;;;;;;;;;;;;;;;;;;;;;;;;;;;;;;;;;;;;;;;;;;;;;;;;;;;;
(require 'yasnippet)
;; To get a bunch of extra snippets that come in super handy see:
;; https://github.com/AndreaCrotti/yasnippet-snippets
;; or use:
;; git clone https://github.com/AndreaCrotti/yasnippet-snippets.git ~/.emacs.d/yassnippet-snippets/
(add-to-list 'yas-snippet-dirs "~/.emacs.d/yasnippet-snippets/")
(yas-global-mode 1)
(yas-reload-all)
I’ve found that there are some missing that I will add and also that some seem to add incorrect code or don’t work.
Now let’s load up company and the backends we will want to use.
I’ve generally found that semantic completion is quite slow
and gives irrelevant results. However, semantic is really nice
for navigating around a file using helm. The shortcut I’ve set
is C-c h i. For navigating between files I still recommend RTags.
I also provide functions my-enable-semantic and my-disable-semantic
to enable and disable semantic completion so you can easily change
it if you wish. The code in my init file is:
;;;;;;;;;;;;;;;;;;;;;;;;;;;;;;;;;;;;;;;;;;;;;;;;;;;;;;;;;;;;;;;;;;;;;;
;; Set up code completion with company and irony
;;;;;;;;;;;;;;;;;;;;;;;;;;;;;;;;;;;;;;;;;;;;;;;;;;;;;;;;;;;;;;;;;;;;;;
(require 'company)
(require 'company-rtags)
(global-company-mode)

;; Enable semantics mode for auto-completion
(require 'cc-mode)
(require 'semantic)
(global-semanticdb-minor-mode 1)
(global-semantic-idle-scheduler-mode 1)
(semantic-mode 1)

;; Setup irony-mode to load in c-modes
(require 'irony)
(require 'company-irony-c-headers)
(require 'cl)
(add-hook 'c++-mode-hook 'irony-mode)
(add-hook 'c-mode-hook 'irony-mode)
(add-hook 'objc-mode-hook 'irony-mode)

;; irony-mode hook that is called when irony is triggered
(defun my-irony-mode-hook ()
  "Custom irony mode hook to remap keys."
  (define-key irony-mode-map [remap completion-at-point]
    'irony-completion-at-point-async)
  (define-key irony-mode-map [remap complete-symbol]
    'irony-completion-at-point-async))

(add-hook 'irony-mode-hook 'my-irony-mode-hook)
(add-hook 'irony-mode-hook 'irony-cdb-autosetup-compile-options)

;; company-irony setup, c-header completions
(add-hook 'irony-mode-hook 'company-irony-setup-begin-commands)
;; Remove company-semantic because it has higher precedance than company-clang
;; Using RTags completion is also faster than semantic, it seems. Semantic
;; also provides a bunch of technically irrelevant completions sometimes.
;; All in all, RTags just seems to do a better job.
(setq company-backends (delete 'company-semantic company-backends))
;; Enable company-irony and several other useful auto-completion modes
;; We don't use rtags since we've found that for large projects this can cause
;; async timeouts. company-semantic (after company-clang!) works quite well
;; but some knowledge some knowledge of when best to trigger is still necessary.
(eval-after-load 'company
  '(add-to-list
    'company-backends '(company-irony-c-headers
                        company-irony company-yasnippet
                        company-clang company-rtags)
    )
  )

(defun my-disable-semantic ()
  "Disable the company-semantic backend."
  (interactive)
  (setq company-backends (delete '(company-irony-c-headers
                                   company-irony company-yasnippet
                                   company-clang company-rtags
                                   company-semantic) company-backends))
  (add-to-list
   'company-backends '(company-irony-c-headers
                       company-irony company-yasnippet
                       company-clang company-rtags))
  )
(defun my-enable-semantic ()
  "Enable the company-semantic backend."
  (interactive)
  (setq company-backends (delete '(company-irony-c-headers
                                   company-irony company-yasnippet
                                   company-clang) company-backends))
  (add-to-list
   'company-backends '(company-irony-c-headers
                       company-irony company-yasnippet company-clang))
  )

;; Zero delay when pressing tab
(setq company-idle-delay 0)
(define-key c-mode-map [(tab)] 'company-complete)
(define-key c++-mode-map [(tab)] 'company-complete)
;; Delay when idle because I want to be able to think
(setq company-idle-delay 0.2)

;; Prohibit semantic from searching through system headers. We want
;; company-clang to do that for us.
(setq-mode-local c-mode semanticdb-find-default-throttle
                 '(local project unloaded recursive))
(setq-mode-local c++-mode semanticdb-find-default-throttle
                 '(local project unloaded recursive))

(semantic-remove-system-include "/usr/include/" 'c++-mode)
(semantic-remove-system-include "/usr/local/include/" 'c++-mode)
(add-hook 'semantic-init-hooks
          'semantic-reset-system-include)
To start company completion just press tab. I’ve found that sometimes
it will timeout and not offer any completions. When this happens
I find that most of the time pressing tab again gives the completions.
Sometimes it may appear to hang for a brief period of time. This I
believe occurs when RTags is being queried for completions. You can
navigate the completions menu using M-n and M-p then pressing
enter to select the desired completion. Note that return types
in C++ are denoted using the postfix syntax --> type.
Directory local variables can be very useful for setting behaviors for
individual projects. For example, setting the build path, CMake flags,
or compiler flags is best done by using directory local
variables. These are set in a file called .dir-locals.el and Emacs
searches up the directory tree until it finds one so you only need to
add it to the root directory of your project. Here is an example of
how to set the directory local variables for a project
((nil . ((cmake-ide-build-dir . "../build/"))))
((nil . ((setq helm-ctest-dir "..//build/Tests/"))))
((nil . ((cmake-compile-command . "-DCMAKE_VARIABLE=blah"))))
((nil . ((cmake-ide-clang-flags-c++ . "-I/usr/local/include -I/usr/include -I/path/to/my/include/"))))
((nil . ((company-clang-arguments . ("-I/usr/local/include -I/usr/include -I/path/to/my/include/")))))
Without setting directory local variables the code completion and
syntax checking tools may not know how to properly compile your code,
which means they also cannot function properly since they compile your
code to see if what you are changing is functional. What I have
noticed is that sometimes you need to restart Emacs (Aquamacs) in
order for the directory local variables to properly take effect. This
seems to be true if you open a source file of your project before
adding the .dir-locals.el file.
Before moving on I want to show you some of the useful things that
you can auto-complete using this infrastructure.
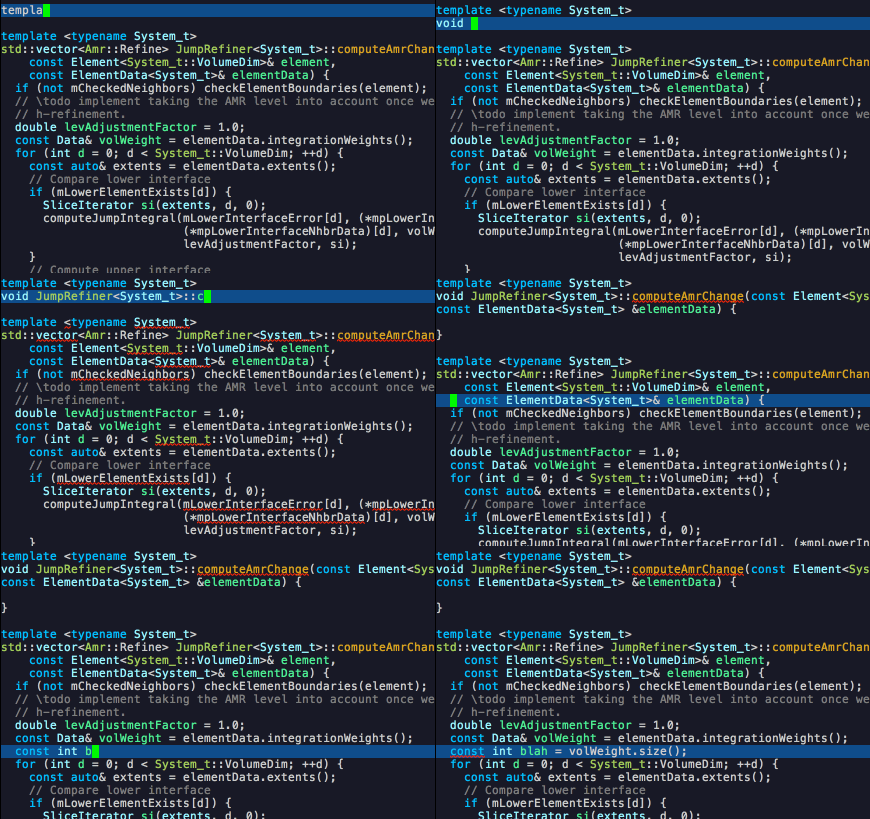
If you know the first few letters of a function you can quickly complete
the entire member function name with the correct arguments:
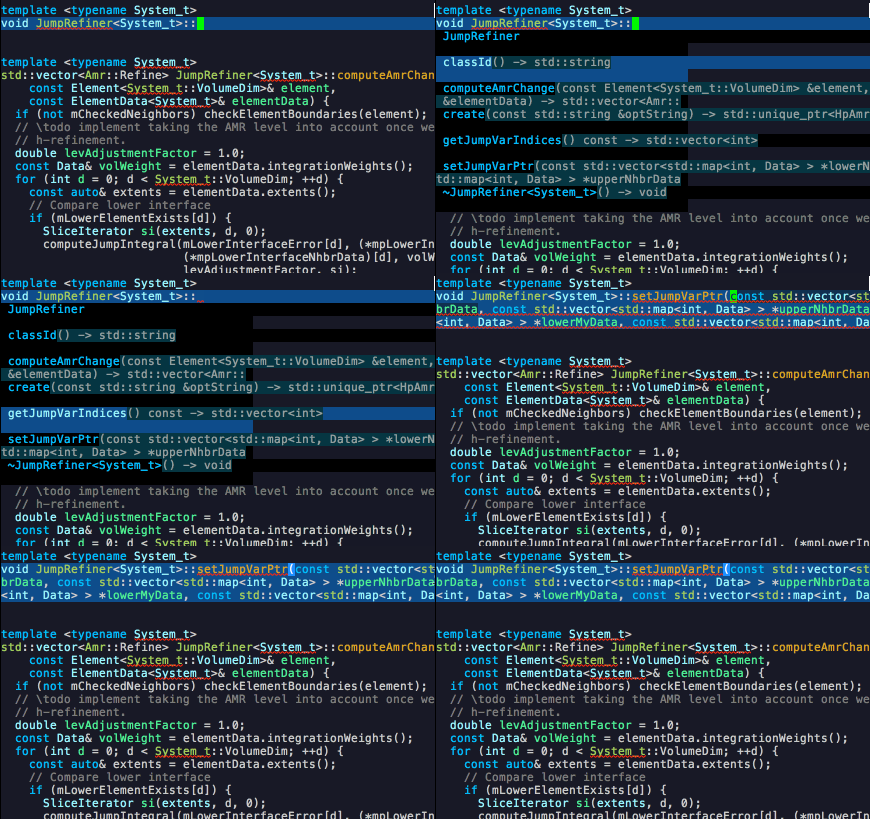
If you cannot remember the member functions then you can get a full list
too. This is a bit finicky sometimes, but here is an example of what
the list looks like:
Finally, you can use the snippets from Yasnippet to get an entire class
template complete with move and copy constructors and assignment operators.
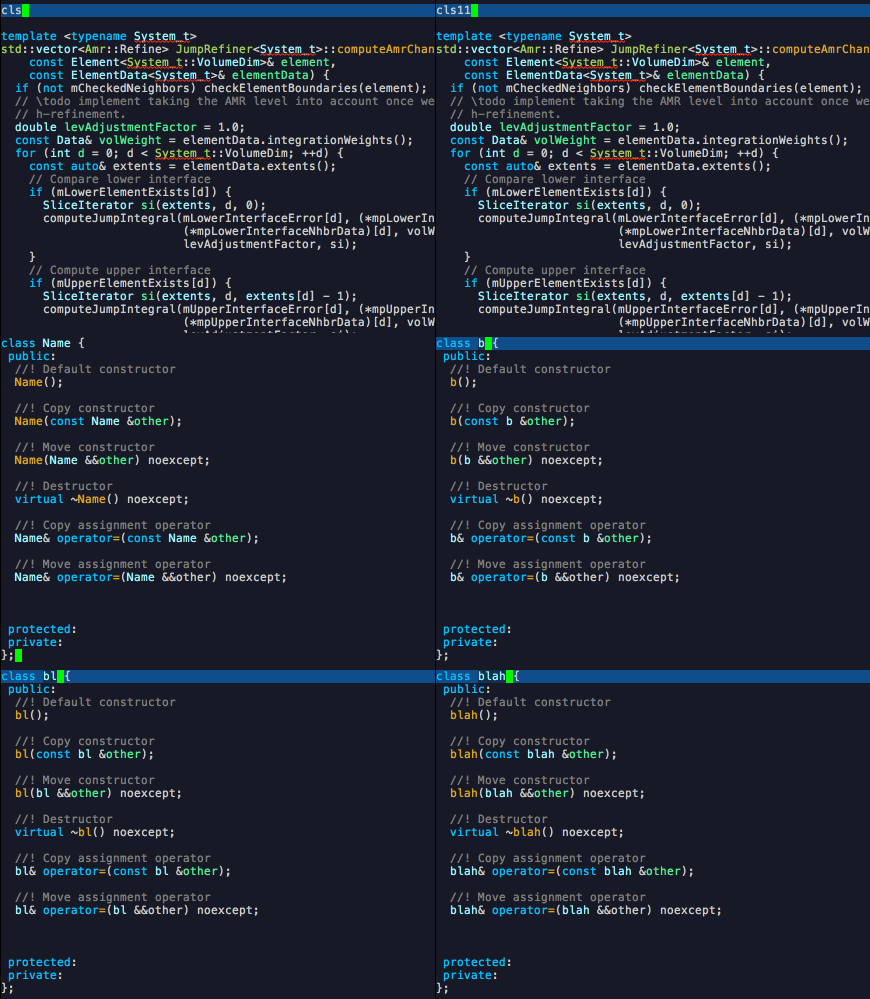
This is just an example. You can add any snippets
and shortcuts you want, which is what makes Yasnippet so great.
Spell Check: Flyspell
Something that I find to be quite useful is on-the-fly spell checking. Flyspell offers this for all your buffers and restricts itself to comments when checking your code. Nobody wants an embarrassing spelling mistake in their comment and this fixes that. The code I use to set up Flyspell is:
;;;;;;;;;;;;;;;;;;;;;;;;;;;;;;;;;;;;;;;;;;;;;;;;;;;;;;;;;;;;;;;;;;;;;;
;; Flyspell Mode for Spelling Corrections
;;;;;;;;;;;;;;;;;;;;;;;;;;;;;;;;;;;;;;;;;;;;;;;;;;;;;;;;;;;;;;;;;;;;;;
(require 'flyspell)
;; The welcome message is useless and can cause problems
(setq flyspell-issue-welcome-flag nil)
;; Fly spell keyboard shortcuts so no mouse is needed
;; Use helm with flyspell
(define-key flyspell-mode-map (kbd "<f8>") 'helm-flyspell-correct)
;; (global-set-key (kbd "<f8>") 'ispell-word)
(global-set-key (kbd "C-S-<f8>") 'flyspell-mode)
(global-set-key (kbd "C-M-<f8>") 'flyspell-buffer)
(global-set-key (kbd "C-<f8>") 'flyspell-check-previous-highlighted-word)
(global-set-key (kbd "M-<f8>") 'flyspell-check-next-highlighted-word)
;; Set the way word highlighting is done
(defun flyspell-check-next-highlighted-word ()
  "Custom function to spell check next highlighted word."
  (interactive)
  (flyspell-goto-next-error)
  (ispell-word)
  )

;; Spell check comments in c++ and c common
(add-hook 'c++-mode-hook  'flyspell-prog-mode)
(add-hook 'c-mode-common-hook 'flyspell-prog-mode)

;; Enable flyspell in text mode
(if (fboundp 'prog-mode)
    (add-hook 'prog-mode-hook 'flyspell-prog-mode)
  (dolist (hook '(lisp-mode-hook emacs-lisp-mode-hook scheme-mode-hook
                  clojure-mode-hook ruby-mode-hook yaml-mode
                  python-mode-hook shell-mode-hook php-mode-hook
                  css-mode-hook haskell-mode-hook caml-mode-hook
                  nxml-mode-hook crontab-mode-hook perl-mode-hook
                  tcl-mode-hook javascript-mode-hook))
    (add-hook hook 'flyspell-prog-mode)))

(dolist (hook '(text-mode-hook))
  (add-hook hook (lambda () (flyspell-mode 1))))
(dolist (hook '(change-log-mode-hook log-edit-mode-hook))
  (add-hook hook (lambda () (flyspell-mode -1))))
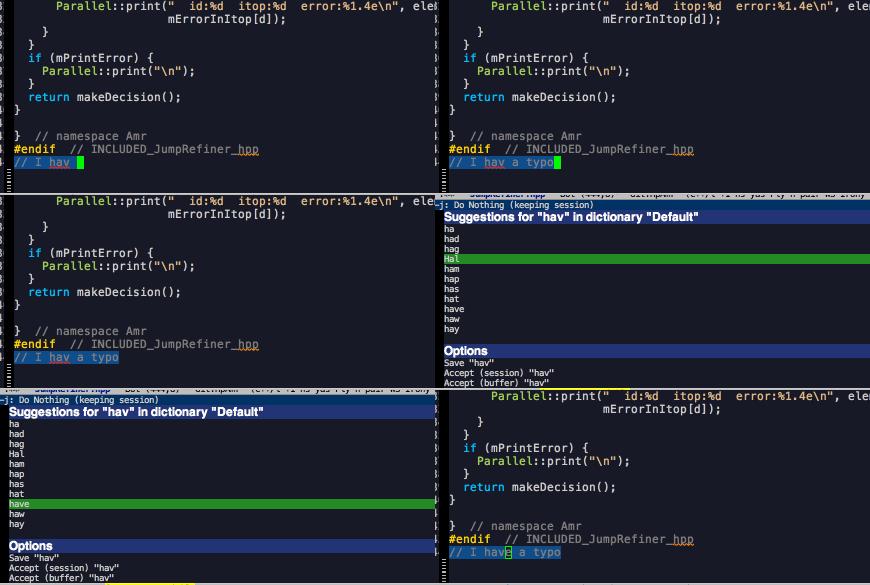
For a list of corrections I again use helm (helm-flyspell).
To pull up the options move the cursor over the word you
want to correct and then type F8 (on a Mac you must use the
fn key). Here is an example of what this setup looks like
in action:
Miscellaneous
In order to keep this post to a somewhat reasonable length I’ll end here with Magit and cmake-mode. My Magit configuration is
(global-set-key (kbd "M-g M-s") 'magit-status)
(global-set-key (kbd "M-g M-c") 'magit-checkout)
and to load cmake-mode I use
(require 'cmake-mode)I have customized my Emacs configuration a great deal more. My current
init file is ~650 lines long, whatever that’s worth. I have a header
that shows the current function and the path to the current file,
but this required customizing the font a great deal to make it
legible and nice. I’ve uploaded a complete version of my Emacs file
here and will eventually make a public copy on
either GitHub or BitBucket. If you want you can simply copy the
entire contents of init.el into your ~/.emacs file and you should
automatically have the entire configuration set the way I do.
I hope you found this guide useful and please email me with any questions, feedback and/or suggestions.